 Add to Favorites! Add to Favorites!
 Home About us Products Contact us Distributors
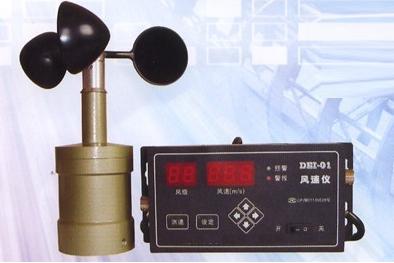 |
Anemometer A Power-connection Air velocity Alarm meter is an instrument that is widely used in railway, port, dock and field. Power-connection Air velocity Alarm meter is designed from SCM, it is full-functioned, convenient to use, high sensitive, dynamic change and fast-reading. Special requests by customers can be fulfilled if signning a contract with us. Ⅰ. Technical parameters 1. Measurement range: 1.0~60.0 m/s Reading error±(0.5+0.05V)m/s V: the tested value of wind velocity 2. Display mode: LED display, 3-digit wind velocity, 2-digit wind level display 3. Speed of display: 3 times per second 4. Types of product:
5. Power supply: 220V±10% 50Hz Fuse: 1A Φ5×20
6. Instrument size: Sensor
height: 200mm
7. Display weight:
approximately 0.8kg 8. Working environment: the sensor works under -35℃~+45℃ and 10%~100% RH 9. Corresponding form between wind level and wind velocity
Ⅱ. Basic functions The wind acts on the vane of sensor and drives the photoelectric coded disc in the sensor. The output of pulse number wind strength The strength of wind and the photoelectric coded disc output pulse rate of the sensor are managed by SCM’s counting and the value depends on it, the value will be shown on the LCD the 2-digit wind level and 3-digit wind speed value at the speed of 3 changes per second. According to users’ request, the pre alarm value and alarm value can be set up, when the wind velocity reaches or exceeds the pre alarm value or alarm value that are set, the pre alarm light (green) or alarm light (red) will be lightened, at the same time, the buzzer will ring. According to users’ request, during the changes of wind velocity on the LCD, the 0~5V voltage or 4~20mA current or RS-232 serial port can be output, and the output of relay touch will be increased accordingly.
Ⅲ. Mainbody introduction and the operation of control panel Control panel: Switch: please set the power off when it is out of use. 1. Function key:There are 6 functional keys on the panel, the introduction of the keys are as below: a) “RUN” key: after the power is set on, the instrument will be in display velocity mode. Under the “Set” mode, only the “Run” key is pressed that the wind velocity is tested and the wind level & wind speed are displayed.
b) “SET” key: to set the pre
alarm value and alarm value, only if the “SET” key is pressed that the
parameters setup mode can be entered, and you can set the parameters. Press
the “Set” key to set up the pre alarm and alarm value. At this time, the
“wind level” displays the value name that is set up, when the wind level is
“01”, the pre alarm value can be set up, and the wind velocity displays the
pre alarm value; when the wind level is “02”, the alarm can be set up, and
the wind velocity displays the alarm value. After it is setup, press the
“Run” key and it will return to the c) Direction keys 01- pre alarm setup; 02-alarm setup; Left and right keys: to switch between 01 and 02; Up and down keys: to adjust the wind velocity value 3. Indicator and buzzer When the wind velocity reaches the set value, the pre alarm indicator (green light) will turn on but the buzzer doesn’t ring, and when the wind velocity falls down (less than the set value), the indicator (green light) will turn off automatically; When the wind velocity reaches the set value of alarm, the alarm indicator (red light) will turn on and the buzzer rings, after the tested result falls down (less than the set value), the buzzer stops ringing while the alarm indicator (red light) keeps on to remind the user that the wind velocity has ever reached the almarm value. After the “Run” key is pressed, the red light will turn off. 1. The right side of the display is 3-pin power plug. 2. The left side of the display is 4-pin input of sensor: Pin 1: 5V DC; Pin 2: input of pulse; Pin 3: Signal Ground; Pin 4: 3-pin shielded line must be connected to the groud, don’t connect the shielded line to the Signal Ground. Remark: the input 4 feet of 4-pin sensor must be connected to ground, short circuit with zero line of 220V alternating current is forbidden, nor connecting with the signal ground is allowed. Ⅳ. Installation and debugging 1. The good place of installing the sensor is commanding point and the around is void, no obstacles stopping. On the top of the stand tube, its outer diameter should beΦ52mm, its inner diameter >Φ30mm. It is necessary to install lightning rod. 2. When the display is fixed, set the power on for pre-heating for 1 minute, and then stir the vane manually, if the value of wind velocity and wind level changes accordingly, it means the instrument works properly. 3. Make sure the correct connection of the earth wire for the sensor and display. 4. Don’t enlace the cable conductor of the instrument with any high frequency cable conductor to avoid velocity signal disturbing; shielding wire if preferable if it is installed in high power frequency disturbing districts. Ⅴ. Maintenance 1. The buttons on the control panel are touch switches, to avoid affecting its using life, press the keys with hand instead of using screwdriver or other hard objects. 2. The vane of sensor is in high intensity which can work well even if the wind is fiercely, but it is not allowed to fall down from high places or impact with other objects, or it may be damaged. 3. We guarantee the quatity for 24 months against natural malfunctions from the date of delivery, during the period, we provide free repair or replacement (Factitious damage is exceptive). 4. According to special requests, we can provide OEM products to customers. Ⅵ. Kit of anemometer 1. Wind velocity sensor: 1 unit 2. Wind velocity display: 1 unit 3. 20m 3-core cable: 1 unit (the actual length can be different according to customer’s requirement) 4. Operation manual: 1 unit 5. Qualified certificate: 1 unit | ||||||||||||||||||||||||||||||||||||||||||||||||||||||||||||||||||||
Rinch Industrial Co.,Limited
Address: Room302, Building 17 No.35 Dedu road, Baoshan, Shanghai China Zip code: 200941
Tel: 86-21-36300944 Fax:86-21-36300944 Msn:goodluckvon@hotmail.com email:cnrinch@gmail.com
